All about the square-in-a-square with the Claremont Quilt

Alright, grab a mug of tea and your current favorite quilt and let’s chat about the square-in-a-square component, sometimes called a diamond-in-a-square.
The square-in-a-square component makes up the center of our sawtooth stars in the Claremont Quilt and is used a lot in the quilting world.
The square-in-a-square can sometimes be a bit tricky as they require an accurate 1/4” seam allowance with very little wiggle room for the large, center square. No matter what size square-in-a-square you are making, your center square will finish 1/2” smaller than it was to begin with, leaving your 1/4” seam allowance on all sides.

But, as with all things, practice helps and be patient with yourself as you try something new! Let’s begin by making one.
Making a Square-in-a-Square

You can follow along with the instructions in your pattern and gather your four smaller squares and one larger square. Then, begin by drawing a diagonal line from one corner to the opposite corner on the backside of all of your smaller squares.

Place one marked square on one corner of the large square, making sure your fabrics are right sides together. Then sew on the line you marked.

Then, turn the unit around and place a second background square on the opposite corner and sew. Using a ruler, measure your 1/4” seam allowance and trim.

Repeat the steps above for the opposite two corners. You will notice the second square overlap the first squares a little bit. This is correct and it is what creates the 1/4” seam allowance so that you keep your lovely points of your square-in-a-square.

Then, trim and press and viola!

How to manage directional fabric in your square-in-a-square.
If you are working with directional fabric, chances are you would like everything facing the same direction when you are finished and there is a simple way to make sure that happens.
Start out by making sure that when you place the first two smaller squares in opposite corners that the fabric is oriented in the same direction. Then sew, trim and press.

As you are placing the remaining two smaller squares down to sew, rotate them around 180 degrees, then before sewing, flip up the corner as you would when you are pressing the block and double check that the fabric is facing the right direction. Then sew, trim and press.

Trimming your square-in-a-square.
Remember when we sat down to chat and our tea was warm and I mentioned these components can sometimes be tricky? Here’s where that trickiness can occur. Technically, these components do not require trimming if your seam allowance is accurate. But, if you’re anything like me, it is not always completely accurate.
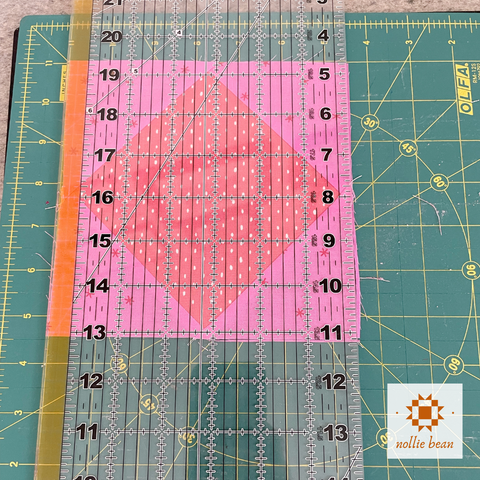
After I sew my component, I place it on the cutting mat and first measure it’s overall size to make sure it’s not too small. (If it is too small, make adjustments for your future components and double check you are sewing directly on your marked line).

Then, I check to see if any sides need to be trimmed by placing my ruler’s 1/4” marked line directly on the point of the middle square and trimming off any excess fabric (which with any luck is very minimal). I then repeat this step on all four sides.

And there you have it! Do you enjoy making these? For me, I would say they are third in line behind flying geese (my all-time favorite quilting component) and half square triangle (which I have a love/hate relationship with due to all of the trimming!).
I hope you find this information helpful! Happy sewing!


Hi Jenni, I enjoyed watching you make the square in the square block. I was wondering if the size of the little squares must be a certain size for the middle square. I imagine naturally, the small square change sizes as compared to the large square you are sewing them to, to complete the block. Is there a rule for this?
Thanks, so happy I found your website.
Thank you for the pattern.