Stella Lane Quilt: Fabric Selection

This is the first post in a multi part series talking all about the Stella Lane quilt pattern. We’re going to talk about fabric selection, prep and organization today!
Don’t have the pattern yet? You can pick up your copy here!
Looking for a little backstory? I share about the inspiration for the pattern and share a little behind the scenes when designing the pattern here!
Okay…you have your pattern, you have either wrapped up your last project or placed it away with your other WIPs and you’re ready to dive head first into this new project! Awesome! Let’s talk about fabric selection for the Stella Lane quilt!

Fabric Selection
This is a unique quilt that only uses five fabrics, but bursts with color and movement! So, how does that happen? The Stella Lane block is a simple block with four colors, but we’ll spend a little time up front organizing ourselves to make sure we end up with that wonderful cascading effect in our finished quilt.

So, a few tips when selecting your five fabrics - you’ll want to choose a palette that blends. An easy way to do this is to find a print you love and then grab a few complimenting fabrics that share colors in that print. Then, the secret weapon to really have your quilt pop is to make sure one of those complimenting fabrics is BOLD!
This is very easy to see demonstrated in the bold teal kit! That Kona Bluegrass packs a punch!
A quick note on directional prints. The Stella Lane block is constructed in a similar fashion as the Paradise Lane quilt block - using four sub-blocks. While it is not ideal for directional prints, if you’re using one I would suggest following a symmetrical approach. When sewing your blocks, have the directional print going towards the center of the block rather than “up”. This will make it easier to construct your final quilt top and not require extra yardage and care when cutting your strips.
I’d also like to make a quick note that even though this pattern uses 2 1/2” strips, it is not ideal for a Jelly Roll. You would not receive the same look of the finished quilt. If you have a jelly roll on hand, I would suggest using it to make a Desert Cove quilt.
Fabric Organization
You’ve picked out your fabrics….awesome! Now, let’s take a moment to determine which fabrics are Colors 1 through 5. If you haven’t done so yet, I would recommend printing your companion pages and having your chart of fabric labels handy.
Go ahead and start playing with the order of your fabrics. In order to have the cascade effect within the final quilt, you’ll want to arrange your fabrics in an order that makes sense. Is it ombre? Is it from bold to soft? Loud prints to solid? Saturated color to muted color?
The quilt that I’m sewing up as I write this series is a blue quilt for my son’s bed. Since I’m going with a monochromatic palette, it is very easy to arrange. I’m starting with the bold print and then following up in an ombre of dark to light.
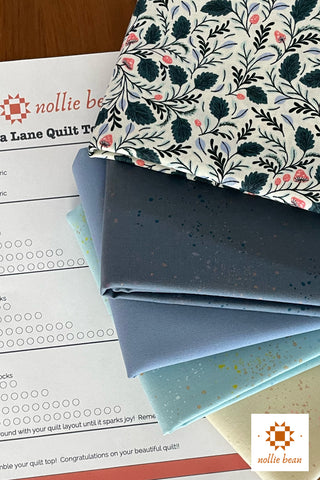
If you purchased one of the quilt kits or selected similar fabrics, I arranged the fabrics in their pictures in the order that made sense to me with Color 1 on top and Color 5 on the bottom.
Once you have determined your layout, let’s do our selves a favor and write the names on our labels before we start cutting! I tend to write something that makes sense to me - such as dark blue or blue print. You can also keep yourself organized by taping a small scrap of the fabric on the chart for reference.
Cutting our pieces
If you’ve following me for any length of time, you know this is my LEAST favorite part of the quilting process. The dreaded cutting of the fabric! If you’re also like me, I have some good news for you - this quilt is straight forward and easy to cut! There’s no background fabric and we’re just cutting strips and then sub-cutting those strips!
If you have a stripology ruler, you should have it handy. I don’t have one yet, but I’m thinking it might be time to invest in one??
Separating and Labeling
Once all of your pieces are cut and ready to go, let’s finish up our organization before we call it a day and celebrate our hard work.
Pull out your pins and your handy-dandy label chart that is already filled out with your fabrics and begin cutting out your labels. I like to work block-by-block by cutting out just one column and pinning the label to the stack of fabrics.
I also cut out the “Block A” label at the top of the chart and use it to keep my blocks separate and organized throughout the process — I’ll talk more about this in our next blog post!
Now, just work column by column getting everything nice and labeled. Once you’re done, go ahead and celebrate!
If you’re like me, you’re probably starting to sew up that first block! In the next blog post of this series, I’m going to share all about making these blocks and my tips and tricks for keeping everything organized throughout the process :)

